
Connecting an electric boiler 380. How to connect and install an electric heating boiler - diagram, installation and site selection

There are several on the market various options heating boilers: on liquid, solid and gas fuels. But due to the ease and availability of food electric boilers are more popular. In 5 cases out of 10 it is an electric or mixed gas boiler. Before installing an electric boiler, you need to correctly calculate the installation diagram depending on the voltage and select it. How to do this without errors, we will discuss in this article.
Advantages and disadvantages of an electric boiler
Electric boilers are discussed in numerous forums on the net. Starting from personal experience, I’ll say, we also have such a boiler hanging, and we have been using it for more than 5 years. During this time, both positive and negative sides similar equipment.
Advantages of an electric heat generator
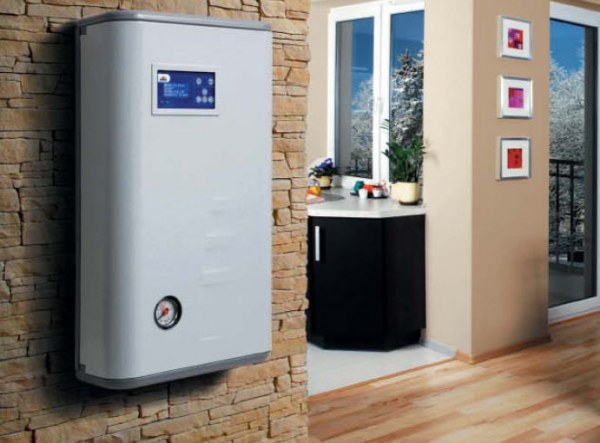
- small size and stylish design make it possible to install a heating boiler anywhere with access to electricity.
- Ease of installation at minimal cost.
- Reliability and ease of operation make it possible to operate the boiler without special training.
- Easy to adjust temperatures, and some models have a temperature sensor. This significantly reduces energy costs.
- Some models have the ability to heat running water (in mixed forms), which makes it possible to save money and not install a column. Moreover, the installation of the column requires special permissions.
- An electric heat generator does not need a chimney, and elementary locksmith keys are used for installation.
- Maintenance and repair can be done by hand.
- The efficiency is higher than that of gas or solid fuel models.
Cons of an electric boiler
![]()
- Electricity bills in winter period when heating an area of 100 m 2 more than 2,000 rubles. But if we compare the cost of gas and the costs of users of gas boilers, it becomes clear that it is more profitable to burn electricity.
- Unfortunately, electric companies in Russia are not immune from breakdowns and at any time the electricity can be turned off. The heating boiler will turn off, this is especially sensitive during autumn maintenance work. And these are carried out in many hinterlands of our country.
- During power surges, the boiler may burn out or turn off.
From my own experience: We have Chefardent Marie, this is a French model with a flow hot water. The system is completely electronic and his “brains” are blown out once a year, either from insufficient water pressure, or from the fact that the electricity was turned off. Our family has already regretted more than once that they installed this type of boiler. But do not generalize, perhaps this is just an unsuccessful model.
In Europe, electric boilers rank first in terms of use and, in the future, heating private houses for this technique. You just need to choose the right model. And a sudden blackout does not happen so often, it is best to have a fallback option for such moments (a second boiler, for example, on solid fuel).
Features of connection and strapping
 Before connecting, you need a wiring diagram for the connection. It is similar to, but the difference is that the installation site does not need to be additionally equipped and not chosen so carefully. The main thing is the availability of power. The scheme is calculated depending on the power of the boiler and the proposed system (one or two circuit). It was previously impossible to draw up a diagram and connect the system just like that, but since 2013, permission from the Electronadzor is not needed. You can install the device yourself.
Selecting a location for installation
You can place an electric heater anywhere in the house. The main thing is that it has free access for strapping, so you will facilitate maintenance in the future.

It is also worth noting that the power of the boiler is different, which line it needs (three or two phase) depends on it. Let's talk about this in more detail.
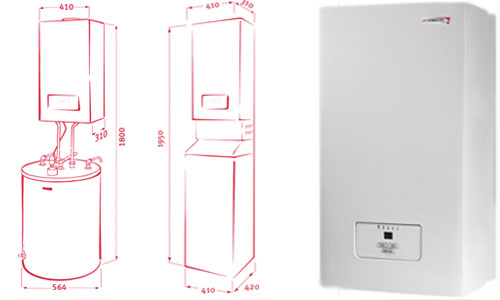
Manufacturers offer two types of electric heating boilers: floor and wall. The floor view is more powerful and suitable for a house area of more than 600 m2. The power of such a heat generator is more than 60 kW, which means you need to use a three-phase outlet.
Wall-mounted with a lower power of 5-60 kW and are able to heat an area of \u200b\u200bless than 600 m 2. It is important to understand that any electric generator with a power of more than 12 kW is connected only to a three-phase outlet.
It is also important to position the lower pipe below the radiator, so the water will circulate freely in the system.
Preparing an electric boiler involves a complete check. Since the heater is electric, before installation and first start-up, you need to check the integrity of the wiring. If there are gusts or pinched wires, they must be connected and insulated. But twisting for an electric generator can only be temporary, since the voltage (especially of a three-phase network) is high; such temporary buildings cannot be left for a long time.

Residual current device
The system must be free of dust and dirt. And most importantly, protect the boiler from power surges even before the first start. For this, a special RCD device is used. RCD is a protective connection device. In three-phase systems, a circuit breaker is additionally mounted next to the heater. The RCD and the switch must be located as close as possible to the boiler and in the public domain for the owners. So the boiler will be insured against any power surge and unforeseen network outages.
Features of installing the boiler in the network
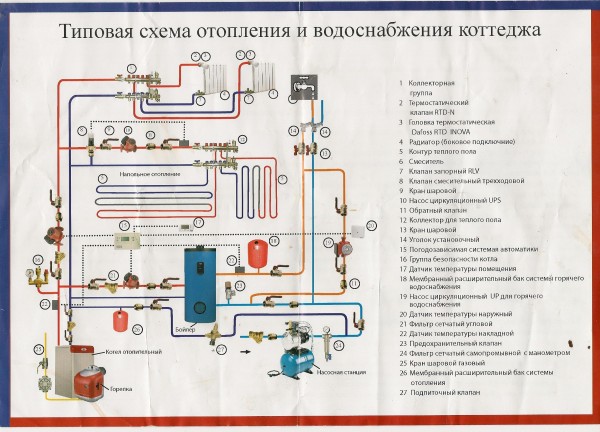
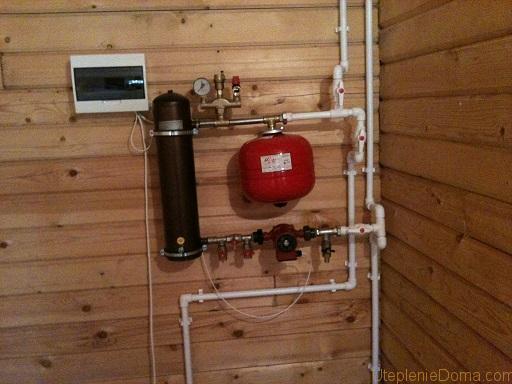
Typical boiler connection diagram
The electric heat generator system can be natural or forced circulation water. In the second case, a pump is added to the chain, which will draw water under pressure. Natural circulation involves the heating of water and its movement under natural pressure; in this case, an electric heater is mounted at the bottom of the chain. From how low the electric heat generator is located, the heating of the radiators will envy, and the pumping force will be less needed. This is due to the appearance of a large temperature difference in the system.
When installing the circulation pump into the system, where the electric body of the generator will be installed, it does not matter, the main thing is that this is not the highest point. Otherwise, air pockets will form. With their formation, the awning will overheat, and the boiler will fail.
The boiler is installed as in any system, breaking the chain at the junctions of the thermal circuits. As it heats up, water gets into all parts of the system.
Another important point this is the installation of a second, backup boiler. And the use of an electric heat generator suggests such an option. If the backup heat generator does not provide full power, then the installation is done only in parallel. So the generators will not be interconnected and will generate heat with approximately the same power.
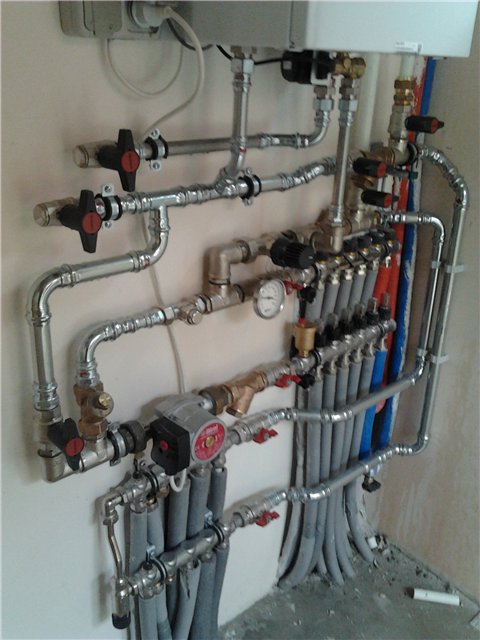
The main thing in piping an electric generator is to think about adjusting the temperature at the inlet and outlet and prevent large drops. When tying a heat generator, it is important to complete two circuits, small and large, a similar option can be seen in the figure. When turned on, water will first be driven through a small circuit and heated, then a larger one is connected. For classic strapping you need:
- Brackets, under different section of pipes.
- Filter to prevent the penetration of small foreign particles into the boiler.
- Check and safety valves.
- Stop valve.
- Circulating pump (if the system will be forced injection).
- Thermometer and manometer.
- Expansion tank.
The piping of an electric heat generator is divided into types:
- With connected circuit hot water(when water enters the tap, directly passing through the boiler).
- With connection to the "warm floor" system.
- Simple connection to the heating system.
The piping directly depends on the model of the boiler, if it is a double-circuit one. In such a case, the system can be connected via a mixer or direct options. It is difficult to connect such a generator with your own hands, since the owner faces two tasks at once:
- Correct connection to the heating system.
- Correct connection to the DHW.
To facilitate work in each model, an instruction is attached with an exact boiler connection diagram. If you do not have time and sufficient education to understand this system, then it is better not to start tying. Specialists will perform such work from 5,000 rubles. (in small towns) and from 30,000 rubles. (in large ones). By paying later, you can avoid big problems.
Connection Features
It is important that the boiler is connected by a separate power line and through an RCD. It will be correct to connect the boiler directly with a line from the electricity meter. But before that, we calculate the power of the boiler. If you connect a powerful generator to a two-phase branch, you can leave the entire area without electricity. Since the wiring of insufficient section will extinguish the resistance power and the generator gearbox will fall, and the power line will overheat.
An important stage is the installation of grounding. Grounding is done directly from the boiler itself to the metal part of the foundation of the building. Amateurs make the mistake of connecting the ground of an electric heat generator to the zero phase of the wiring. This is prohibited for safety reasons, and the RCD will react to such grounding as a short circuit in the generator. Professionals also get into difficult situations when connecting an electric generator:
Connecting an electric boiler, although not a complicated process, requires precise adherence and calculation of the circuit. It is best to entrust such work to professionals, especially since the tying and connection scheme requires a certain amount of power in the network.
From a previous article about we know that there are three methods of heating the coolant. Accordingly, there are three types of boilers: heating elements, induction and electrode. Today we will tell you about connecting an electric boiler to a heating system. Installation is carried out in two stages. The first stage is the connection to the heating system, and the second - to the mains. Given that the units can operate from both 220 and 380 volts, the connection schemes to the power source are slightly different. You need to know how to properly connect an electric heating boiler to a network with different capacities.
Connecting a heating element electric boiler
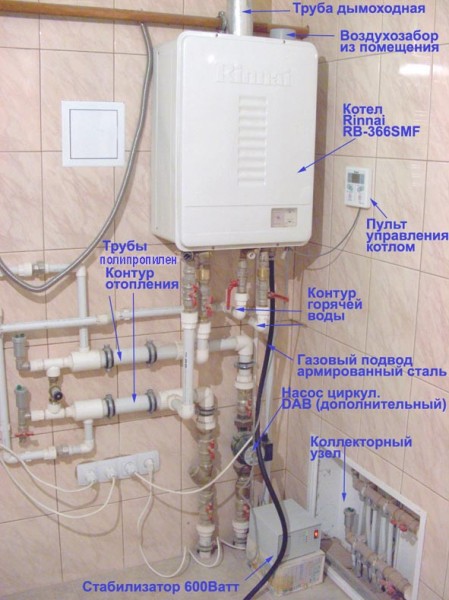
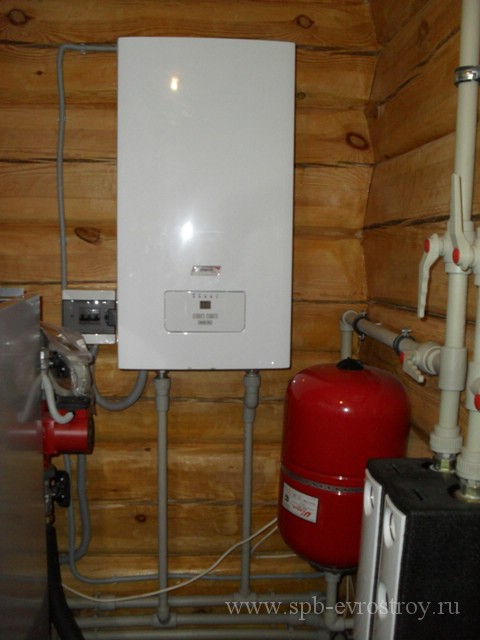
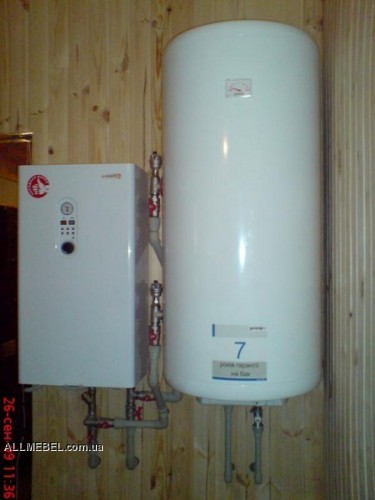
Please note that electric boilers do not need a chimney.
Tenovy electric boiler is the most common for heating residential premises. This is because it is cheap and easy to maintain. Connecting an electric boiler to a heating system on heating elements begins with the fact that space is allocated for its installation. In principle, it does not matter where to put it, the main thing is that you feel comfortable. Such units do not emit any gases, so they do not need a chimney, unlike gas boiler. We talked about it in one of our previous articles.
Before connecting the electric boiler to the heating system, you need to determine the installation method and the number of circuits. There are suspended and floor models that can work on several fronts at the same time. They heat the house and supply hot water. In each case, it must be ensured that the unit is securely fastened. If the boiler is single-circuit, then it will have only two nozzles. Water from the return will flow into one, and the heated coolant will come out of the second.
In double-circuit models, respectively, there are also more than two nozzles. This is the input and output to the DHW circuit.
Before connecting the electric boiler to the heating system, you need to prepare seats on the contour.
The heating boiler is connected to the circuit by means of American women. The connection should be such that when unwinding the American women, they remain on the pipes. For sealing, you can use:
- flax with paste;
- fum tape;
- sealant.
At the junction of the connection between the American and the boiler, sealing materials are not used, since the design of the nut provides for a rubber gasket. Without fail, the scheme for connecting the electric boiler to the heating system must be with a sump in front of the heater. It is impossible for garbage to get on the heaters. If the design of the heating element boiler does not include a circulation pump, then it must be installed separately. The pump is placed before the boiler and after the expansion tank.
After the boiler is already connected to the entire heating system, it can be connected to the network. The boiler may already have sensors and serious “brains” installed that regulate the operation of the heater in accordance with user settings. There are no such excesses in simpler devices, and if you want to expand the functionality of the boiler, you can assemble a separate electrical control unit. Control units can be designed for 220 and 380 volts, while there are units operating in both modes. Switch to the desired voltage manually.
The documents for the heater contain requirements for the thickness of the copper wire and recommendations on how to connect an electric heating boiler. In a single-phase network, a three-core cable is suitable for the unit, and in a three-phase network, a five-core cable:
- phase (one or three);
- zero;
- grounding.
All electric boilers must be grounded - this is a must. Over time, you can expand the range of capabilities of the heater by adding new sensors and automation to the connection scheme for an electric heating boiler.
Connecting an electrode electric boiler
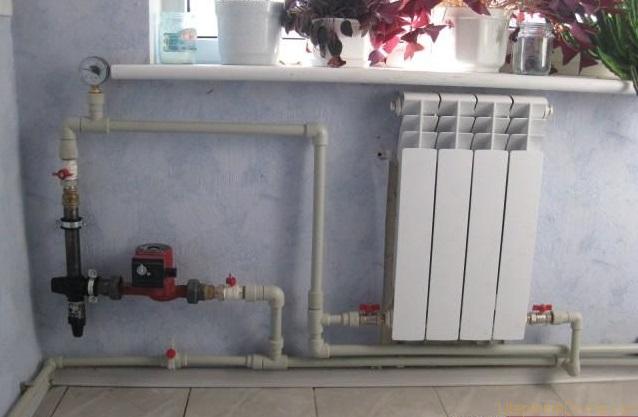
Please note that the pump is not properly positioned.
The electrode boiler is the smallest representative in the niche of home heaters. Undoubtedly, there are different models, with several electrodes, but the most common and well-known small single-electrode boiler. Such a unit can be installed on the circuit both in a vertical position and in a horizontal one. In addition, the scheme for connecting an electric boiler to the heating system may consist of several heaters. They can be assembled into original registers from boilers by serial or parallel connection.
The device does not have a built-in safety group, therefore, in the connection diagram of the heating electric boiler after it, at the supply, it is provided:
- manometer;
- air vent;
- emergency valve.
It is very important to make a reliable grounding. The coolant is heated by electric waves, if the grounding that touches the pipes falls off, it will shock.
Devices up to seven kilowatts operate from 220 volts. More powerful units need a 380 volt network. Location of contacts on the electrode boiler:
- the electrode is a phase (one or three contacts, depending on the network 220 or 380 volts);
- the body is zero and ground.
This diagram shows how to connect an electrode boiler to a three-phase network.
Only phase wires are suitable for the electrode, and there are two contacts with zero and ground on the case. The pump is connected via the control unit. The minimum that should be included when connecting electric heating boilers is temperature sensors that regulate the operation of the heater. It is possible to assemble any control suitable for your operating conditions. A pump must be placed in front of the electrode boiler, despite the fact that even without it, the boiler is able to raise water several meters. Connecting an electric ion-type heating boiler is impossible without salt preparation of the coolant.
Such units can only work if the water in the system has a certain level of salt. By adjusting the amount of salt in the water, you can reduce or increase the resistance of the coolant. There is a plate in the boiler passport, which indicates the necessary parameters for the operation of the heater, such as the current strength. It is inversely proportional to the amount of salt in the coolant. To control the quality and composition of the coolant, it is better to install a special filter for it.
Connecting an induction boiler
This is how an induction electric boiler is suspended. The mount must be reliable, it is quite heavy.
The most common induction boiler is in the form of a pipe with a cross section of about 20 cm and a length of almost a meter. This is a domestic product called "VIN". The electric boiler is connected to the heating system through two pipes:
- straight;
- reverse flow.
Such a boiler does not have any additional circuits, only high-temperature heating circuits. The device is suspended on a wall not lower than 80 cm, while nothing should touch the body along the perimeter of 30 cm. Circulation without a pump is not possible. The supercharger is placed, as always, in front of the boiler. On the pitch is set . Under the cover of the device there is access to the terminals. There can be two or four of them, depending on whether it is a three-phase unit or a single-phase one. The device must be grounded.
The induction boiler can easily cope with large volumes of coolant, so its installation can be accompanied by the installation of a heat accumulator. These are tanks in which there is a coolant with a volume of 200 liters or more. The average size of the heat accumulator is 300-500 liters. It collects heat and releases it when the boiler is turned off, thus increasing the time between heater starts.
The use of electric heating units is the most environmentally friendly and effective way heating medium-sized rooms.
Due to their high efficiency, electric heat generators provide the required temperature in residential premises or offices. The control systems of the units make it possible to adjust their mode of operation accordingly.
There are no mechanically interacting parts in the design of electric heating equipment, which significantly reduces the likelihood of their breakdown.
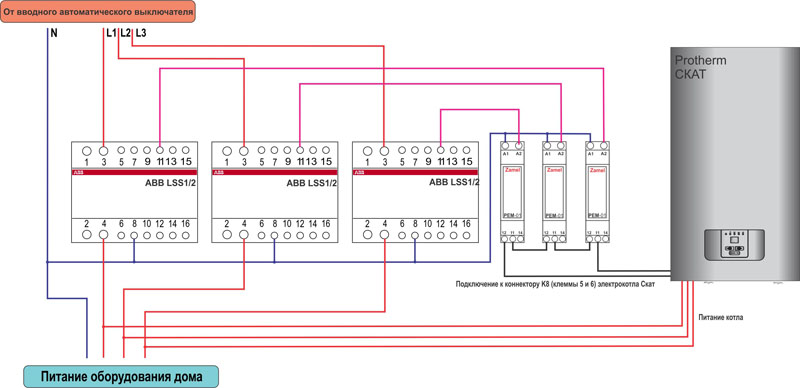
The connection diagram of an electric heating installation, in comparison with units on other types of energy carrier, has its own nuances. Consider how to connect an electric heating boiler, using the Protherm SKAT wall-mounted device as an example.
Preparing for the installation of an electric heat generator
Attention! To install an electric heating unit, a project is being developed in accordance with the local regulations for the electrical distribution network.
The connection of the boiler to the heating system and power wiring must be carried out by a service organization.
The unit must be purchased in its original packaging, which is removed in the presence and with the participation of a representative of a specialized company. The equipment must not have any defects or mechanical damage.
Before installation, the plugs from the nozzles must be removed and make sure that the nozzles of the installation and the system communications are free of dirt. To connect the apparatus, standard sealing materials and gaskets should be used.
Choosing a place to install an electric heat generator
Attention! According to the standards, the heat generator must be located so that there are free distances of at least 50 mm from the sides, 700 mm in front of the device, and at least 800 and 500 mm above and below the device, respectively.
The heat generator must be installed on a wall made of non-combustible material. To hang the device, it is recommended to use the mounting plate, which is included in the delivery set. The plank is attached to the wall with four dowels.
The expansion tank of the membrane type, built into the unit, is designed for a heating system volume of 150 liters. If the system is more capacious, then it is necessary additional installation another membrane pressure compensator.
Attention! It is not allowed to load the connecting pipes of the device with the weight of the pipes of the heating system.
Scheme of connecting an electric boiler to the mains
Electric heating units must be connected copper wire, the cross section of which is not less than that specified in the documentation for the equipment.
External electrical connections of the device are made through cable entries, which are located in the lower left corner. There is also a ground terminal with an M6 bolt made of brass.
Attention! During the installation of grounding, it is necessary to ensure that reliable contact is ensured between the brass bolt and the metal of the apparatus case. The junction of the bolt with the frame of the unit is carefully cleaned.
The wiring diagram for an electric heating boiler involves the use of a room regulator with a potential-free output.
If it is necessary to organize electric heating of large areas, then when purchasing equipment, choose models that provide for the possibility of installing a cascade. For the operation of devices in a cascade, the terminals of the control unit are connected to the terminals of the controlled unit. If a room thermostat controls the installation system, its control contacts are connected to the terminals of the master unit.
Preparing the electrical apparatus for operation
Attention! Before installing the unit, the heating system piping must be flushed several times with pressurized water. In older systems, such flushing should be carried out against the flow of the coolant.
Visual inspection should confirm that the device is in the correct position corresponding to the project, all communications are connected, and the water pressure in the system is within the limits defined by the technical documentation.
- The pipeline fittings located in front of the apparatus are checked for serviceability by switching them to the "Open" and "Closed" positions.
- All pipeline accessories the heat generator, heating system and hot water supply system is switched to the “Closed” position.
- On pipelines leading to the device cold water, it is necessary to open the shut-off valve.
Advice! The system should be filled with water having a minimum hardness, which will extend the life of the heating elements.
In electric heating, it is not recommended to use non-freezing liquids because of their properties that adversely affect the operation of the equipment. Such compounds reduce heat transfer and lead to premature aging and damage to elements made of rubber. If the deviation of the operating parameters of the installation is caused by the use of antifreeze liquids, then the general guarantee does not cover such cases.
- On the return pipeline before entering the apparatus, it is necessary to install a filter or a sump, or both of these devices.
- After filling the system with water, check its tightness.
Upon completion of the installation work, the operability of the water pressure sensor, emergency temperature sensor, thermostat, control and signal elements of the apparatus located on the front cover is checked.
During repairs or unfavorable conditions for installation, electric heaters can be connected to the system using special rubber hoses.
Related publications
-
 “What is useful yarrow?
Yarrow comes across everywhere, but not everyone knows how much health this seemingly inconspicuous plant carries. It cures many diseases...
-
 Tips and tricks on how to cure cervical erosion without cauterization
The main advantage of the treatment of erosion by means of alternative medicine is the natural basis of the prepared medicines. They carefully...