
Do-it-yourself battery installation: rules and technology. How to install heating batteries correctly according to the norms and rules (SNiP) Installation of heating radiators under the window

The window sill plays not only important role for a window, but it can also affect when installing batteries, it should also be taken into account when choosing curtains. We will consider all the features of choosing the correct height of the window sill from the floor and from the radiator. These installation dimensions are important for the heating system.
Product protrusion functions
The protrusion of the window sill may be different. There are almost invisible structures that do not stand out for the window opening, there are also wide, powerful window sills on which you can sit. The design is needed to keep the heat in the house, it can serve as an additional support, for example, to install flower pots.
The window sill should be chosen carefully, it must fit the window design, otherwise it may fail. Replacing a part without removing the double-glazed window is extremely problematic.
Primary requirements
The distance from the floor to the window sill may vary depending on the type of window. However, GOST is provided for the permissible coefficient at which heat is best retained in the room, and the indicator is 0.55 W / ° С × m². This means that in order to achieve the desired effect, you need to use a plate that will have low thermal conductivity.
An important role is played by the distance of the radiator to the window sill: in that case, there is a SNiP, the main provisions of which require:
Height calculation
The distance between the battery and the window sill must be at least 10 cm, regardless of what type of heater is used. You need to take into account the height of the battery itself. Behind you need to step back 8 cm. The battery itself should rise 10 cm above the floor, that is, when installing a window sill from the floor according to SNIP, you will need to step back by 70-80 cm.
An important role is also played by the protrusion of the window sill.: it may move away from the wall significantly or be invisible. If there is no radiator under the window, it is not necessary to meet any requirements, but if heating is present, the protrusion must be strictly regulated. The task of the window sill is to redirect heat flows. Without it, they will rise up, and proper heating of the room will not occur, since part of the heat will evaporate and be distributed on the ceiling.
Poor convection can also be caused by a window sill that is too wide. It will not allow warm air to escape, as a result, condensate will begin to accumulate on the window, as the main air flows will go up, and some of them will get stuck under the window, heating the atmosphere. In this case, it is very important to calculate the distance from the window sill to the heating radiator, both in height and how far it is possible to make a ledge. You can avoid the problem described above by using a slab that does not extend beyond the wall by more than 8 cm.
Advice: when calculating the dimensions, you need to take into account the level of the wall with the finish.
The best option is a solution in which no more than 10% will linger in the window niche warm air. To do this, the window sill should not protrude beyond the battery by more than 6 cm, but should not be shorter than the heater.
If a design solution the premises require the installation of non-standard wide structures, they must be provided with holes for ventilation. Their size must be sufficient for proper air circulation. 
Is clearance needed?
Some window owners believe that the window sill goes deep under window frame, However, it is not. The distance between the window and the window sill is approximately 10 mm. Otherwise, the design may be deformed. The fact is that under the influence of warm air, the material from which the plate is made expands. A gap is left so that the structure can accept desired shape without taking any damage. Visually, this technique is invisible.
How to position the curtain?

The distance of the window sill curtain also plays a role. In order for the curtains to move without clinging, there are no traces left on them, and warm air can circulate freely, the distance must be at least 5 cm.
Conclusion: it is not always possible to apply the standard distance from the floor, radiator, curtains to the window sill, however, you can find a way out by observing certain requirements.
The heat supply system is an integral part of the engineering systems installed in every home. And its arrangement must be treated with special attention. This also applies to the assembly of pipelines, and hanging heating radiators. After all, even a small problem can lead to global implications, so it is important to know how to properly hang a heating radiator.
Work on the installation of radiators must begin with the definition of their connection scheme. In practice, 3 methods are used, they are defined by building codes:
- Side. They are used very often, since it is he who provides the maximum thermal return.
- Diagonal. Most effective when connecting long heaters.
- Bottom connection. They are used for heat supply systems from pipes, which are placed directly under the floor covering.

Instructions for installing heating radiators
After the connection diagrams are determined and heating batteries are purchased, it is necessary to find and carefully study SNiP 3.05.01 - 85. It sets out the requirements for installing heating radiators. Most manufacturing companies attach detailed instructions for installing heaters to their products. If you follow the requirements of regulatory and operational documentation, then problems with the installation of radiators should not arise.
The main requirement is compliance with the dimensions of fixing the heating battery relative to the floor and wall. Otherwise, the heated air will circulate poorly, and the efficiency of the thermal device will drop dramatically. The requirements of regulatory documentation determine that the distance to inner surface window sill and to the floor covering should not be less than 100 mm. Practice shows that 120 mm will be optimal.

Distance from inner wall niches to the rear surface of the radiator should not be less than ¾ of the depth of the mounted battery. If the specified dimensions are not observed, then, as already noted, the efficiency of the heat flow will decrease. If the heater is not mounted in a niche located under the window, but directly next to the wall, then the marked distances should not be less than 200 mm. Neglect of the established indicators will lead to difficulty in the movement of warm air and the accumulation of dust on back wall.
What tool is needed for installation work
In order to carry out the work of installing a heating battery, it is necessary to carry out a small preparatory work and prepare the instrument.

Useful for installation:
- perforator;
- drill (its diameter is determined by the size of the dowel into which the bracket will be screwed);
- roulette;
- building level;
- locksmith tool.
The procedure for assembling a heating radiator
Before starting the installation of the battery, it is necessary to determine the installation location of the fasteners. The number of fasteners is determined by the dimensions of the heater. But even when installing a radiator with minimum dimensions, the number of attachment points should not be less than three.

The next step is to install the battery mounting brackets. To increase the reliability of the system, dowels or cement mortar can be used. Work on installing the battery must begin with checking the complete set of the radiator. Then you can proceed to install the components (plugs, fasteners, adapters) on the heating device.

The requirements of regulatory documentation determine that automatic air vents must be installed on heating radiators. If possible, it is advisable to use a Mayevsky crane.

Crane "Mayevsky"
In addition to the installed devices on the heating radiator, it makes sense to mount ball valves at the inlet and outlet. Their presence will avoid difficulties with dismantling if necessary to repair it. By closing the taps, the radiator can be safely removed.

It will not be superfluous to install thermostats. Their presence will allow you to regulate the supply of heat to heating devices, which will create comfortable temperature in every room.

After installing all the devices and fittings, you can connect the pipelines. How they are connected to the radiator (traditional welding, crimping or threaded connection) depends on the scheme of its inclusion in the heat supply system. The type of connection between the pipes and the battery is determined by the material from which they are made.
At the last stage, it is necessary to test the heat supply system. It must be remembered that during the tests, pipes and radiators are supplied with pressure 1.5-2 times higher than the nominal pressure. It is advisable to keep the system under high blood pressure. This will help installers see how pipe joints and radiator connections behave.
Important! The coolant must be supplied both during tests and when the system is started, gradually opening the tap. Otherwise, a phenomenon such as water hammer can be provoked, which can lead to the destruction of the components of the thermal energy supply system.
After mounting the radiator on the installed fasteners, it is necessary to check the correctness of its placement in the horizontal and vertical planes.

It is allowed to raise the edge of the radiator, on which the air vent is located. This will ensure that the air that has entered the system is collected at the highest possible point, and its release will be carried out quickly and with maximum efficiency.

But a change in level of more than one centimeter is unacceptable, as well as a reverse slope. In this case, the formation of an air pocket is guaranteed, and the supply of coolant further along the pipeline will be limited or stopped.
Advice! Almost all heating companies require installers to install only on pre-prepared walls. That is, the surface must be smooth and clean. This will allow for the correct marking of places for fasteners.
The heating radiator is hung on two hooks (brackets), which are located in the upper part, and the third must be installed as a support for the lower edge of the device. The installer must remember that the number of brackets is determined by the weight and length of the battery.
There are two types of radiators according to their mounting location - floor and wall, therefore, the second option implies that a certain installation height of the radiator from the floor must be observed, which will allow it to be connected to the heating system without any problems.
Bimetallic radiators - section height 570 mm can be used on the loggia

It should be said right away that if you are waiting for clear instructions on this parameter, then this is in vain, since they simply do not exist, and mainly depends on the installation of the heating circuit, and on the height of the window sills and, in the end, on the height of the section itself . Although, it cannot be said that this parameter does not matter, which is what we suggest you understand now, as well as watch the video in this article.
Installation of technical pipelines and equipment
Recommendation. When installing the system, if the dimensions of the heating radiators in height and length allow them to be installed under windows, then do just that.
The battery under the window creates something like a thermal curtain that limits the movement of cold air flows from the side of the glass.

- At what height from the floor to install radiators, it is laid down when wiring the heating circuit, and it also depends on whether you have a circulation pump embedded. If the system is to work without coercion, then it is quite natural that there should be a slope along the pipes, which means that you need to leave room for the slope of the return pipe if the system is two-pipe, or the supply pipe if it is one-pipe.
- In the "Leningrad" (single-pipe system for 3-4 radiators), the batteries are also arranged with a decrease, since in such cases they do not make a special outlet for the heater - the circuit passes directly through them with a lower side connection.
- Different systems and installation mean that if you step back 10-15 cm from the floor, then the installation height of heating radiators according to SNiP 3.05.05-84 (“Technological equipment and pipelines”) will be quite normal for any circuits. More precisely, the circuit itself should be mounted so that it is possible to comply with these parameters.
What are the contours

By and large, there are two types of radiator circuits - one-pipe and two-pipe, and everything else is already a modification existing system, whether it is mixed (underfloor heating - radiators) or collector heating system. In any of these cases, the instruction requires the use of either one or the other circuit, just various additions are made there in the form of plumbing equipment in the form of three-way or four-way taps and combs.
If a single-pipe system is used, as in the upper schematic image, then the entire coolant is looped in one pipe - it leaves the boiler for supply, and it also comes back, transporting already chilled water for heating.
On the way, radiators crash into it, and the type of connection here does not matter at all - under column, thermal or forced pressure, water, passing by the bends, enters them and passes through the battery, returning back to the pipe.
The problem here is that the coolant, having passed through the heater, already loses its previous temperature, therefore, it goes further already slightly cooled down and the more devices in such a system, the colder they will be, moving away from the boiler.

In order to be able to dismantle the radiator during the heating season without draining the water, a bypass is installed in front of it - this is a pipe that loops the system and is clearly visible on top photo, and a shut-off valve is placed in front of the battery itself.
In addition to helping in dismantling, the bypass also partially contributes to maintaining the temperature of the coolant, because water, passing through it, does not enter the radiator. But in high-rise buildings this device is sometimes used incorrectly - they put a tap on it and shut it off, passing the entire flow through the radiator, therefore, those who live further away get colder water.

In a two-pipe system, there are no problems with cooling, more precisely, it is, but it depends only on the length of the pipe itself and, in general, it turns out to be so insignificant that they don’t even pay attention to it - they are protected by thermal insulation in the mains and there losses are also minimal.
The thing is that the hot coolant flows through the pipe to all radiators, but the cooled water that has passed through the battery does not return back, but is discharged into the return pipe, thus maintaining the original temperature throughout the entire circuit, no matter how many points there are .
But there is one caveat here - the price for installation and operation will be slightly higher, since, firstly, a second pipe is added and, secondly, more water has to be heated, and the parameters of the device do not matter, this may be the height of the heating radiators 250 mm or 1200 mm - it doesn't matter.
Note. If there is a need to jointly connect radiators and a floor heating system, then a two-pipe system is used, but a thermostatic three-way valve is installed in front of the water floor circuit, which redistributes the coolant depending on its temperature.
Installation rules

All four radiator connection schemes that you see in the upper image are applicable for both one-pipe and two-pipe heating systems - the method you will use depends more on the location of the circuit.
However, in autonomous single-pipe heating systems, preference is given to either the lower or lower side connection, but this is simply due to ease of installation and nothing more. In addition, your choice may be influenced by the height of aluminum heating radiators (or from another metal) - as we said, it all comes down to ergonomics.

If you have chosen heating radiators with a height of 800 mm, then in 99% of cases, they will not fit under the window, since you need to retreat not only from the floor, but also from the window sill, at least 10 cm, so such heaters are more often used as warm decorations on the walls.
Therefore, the most common height of bimetallic heating radiators is 600 mm - this way you will be able to maintain the distance from the floor to the window sill, although nothing prevents you from also using appliances 400 or 500 mm high.

In addition, when installing a heating unit under a window, you need to consider not only at what height to hang heating radiators, but also to retreat from the wall so that the gap is at least ¾ of the depth of the device - otherwise the heat transfer will be greatly underestimated.
And once again I would like to return to the height - if you succeed, then try to withstand 12 cm from the floor, but remember that if this distance is less than 10 cm or more than 15 cm, then again you will greatly underestimate the effect of heat transfer ..

In the case when the installation does not take place under windows, for example, floor installation appliances, as in the top photo (here the height of the heating radiators is 400 mm), then at least 20 cm should be retreated from the wall.
Conclusion
In most cases, mounting water heating with their own hands, everyone is trying to place heating devices under the windows, therefore, they use their most common height - 500-600 mm. But that doesn't mean you have to stick to those standards.
High-quality heating is the key to a favorable climate in the house and the absence of cold weather even in the most severe frosts. Therefore, if you have an old and already inefficient radiator in your apartment or cottage, then it should be replaced. At first glance, this seems to be a very difficult job, available only to specialized specialists with significant experience. But with the proper attitude to business and the availability of some tools, installing heating batteries with your own hands does not pose a serious problem.
Rules for the location of the battery and wiring diagrams
In addition to the characteristics are very important, one of the factors affecting the efficiency of the heating system is the choice right place for product placement. True, in most cases it is predetermined in advance - the new battery, most likely, will stand in place of the old cast-iron one, which has been there since the building was built. But still, here are a few recommendations for the proper placement of the radiator.

Firstly, it is desirable to place the battery under the window. The fact is that it is a “bridge” through which cold from the street enters an apartment or cottage. The presence of a radiator under the window forms a kind of "thermal curtain" that interferes with the process described above. In this case, the battery should be placed strictly in the middle of the window, and, preferably, occupy up to 70-80% of its width. What is it and how to install it, you can see on our page.
Secondly, from the floor to the radiator should be at least 80-120 mm. If there is less, then it will be inconvenient to clean under the battery, a huge amount of dust and debris will accumulate there. And if the radiator is located higher, a certain amount of cold air will collect under it, which requires warming up and, as a result, worsens the operation of the heating system. In addition, a too small distance to the window sill negatively affects the battery efficiency.
Thirdly, a distance of 2.5-3 cm is allowed between the back of the radiator and the wall. If it is less, the processes of convection and the movement of warm air flows are disturbed, and, as a result, the battery works less efficiently and wastes part of the heat in vain.

Table. Standard schemes for connecting heating batteries.
| Name | Description |
|---|---|
| Due to the specific location of the risers heating systems in residential buildings, such a battery connection scheme is the most common. It is quite easy to implement, the efficiency of the radiator is average. The main disadvantages of this connection method are visible pipes and unsuitability for batteries with a large number of sections. |
| The second most common radiator connection scheme. The main advantage is the uniform circulation of water throughout the battery, and, as a result, high efficiency. |
| This scheme is often used in country houses- many owners of cottages prefer to hide heating communications under the floor so that they do not spoil appearance rooms. But at the same time, the lower connection of the radiator is 12-15% less efficient than the diagonal one. |


Video - Replacing heating radiators in winter
Installing a heating battery with your own hands - step by step instructions
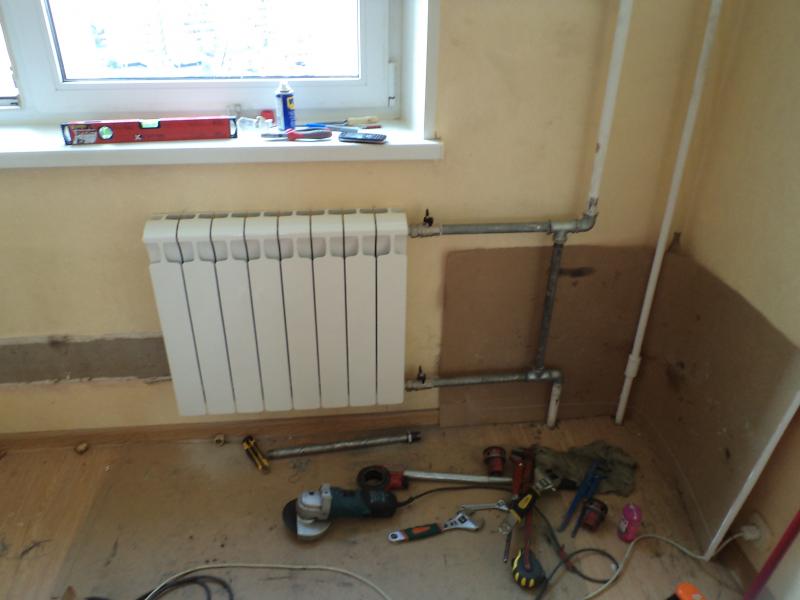
Let's consider the process of installing a bimetallic battery connected sideways to a single-pipe heating system. It is worth saying that in this case the work was carried out in a building where the temperature in the radiators was relatively low, therefore the supply and bypass are made of metal-plastic pipes. Before the beginning self installation batteries, familiarize yourself with the device and characteristics of the heating system at home. Perhaps, for your apartment or cottage, connecting pipes will need to be made from materials with greater resistance to high temperatures.

Let's divide the process of installing a heating battery with our own hands into several separate stages:
- dismantling the old radiator;
- installation of a new bypass and shutoff valves;
- installation of the battery and its connection to the eyeliner.
Preparation for work. Dismantling the old battery
Do-it-yourself installation of a heating battery begins with the preparation of the tool and the dismantling of the old radiator. In this example, we will talk about a standard cast iron product, which still heats many apartments. How are they installed , you can read in our article.
Step 1. Bring home a new battery. Unpack it, check the completeness - whether everything you bought is in place. Also inspect the radiator itself - whether it has any damage or defects.

Step 2 Cut the packaging from under the new battery into two equal parts. Use one as a substrate for the radiator - so you will not scratch it on flooring. Put the second part of the package behind the heating riser - when dismantled with a grinder, a sheet of cardboard will protect the wall from pollution.


Step 3 Prepare everything you need to dismantle the old and install a new radiator - fittings, taps, pipes, tools. Determine for yourself what and where should lie - finding the thing necessary for installation, but lost among the mess, can significantly slow down the work on replacing the battery.

Step 4 Dismantle the three-way valve connecting the heating riser, bypass and supply. First, loosen it with an adjustable wrench. If water starts to drip, screw everything back immediately - most likely, the riser was not blocked properly. And if everything is in order, work on dismantling the crane further.


Step 5 Next, disconnect the old battery and wiring from the riser. First, unscrew the nut on the thread drive. Then determine how far you can cut this thread so that you can then mount a tee connecting the inlet, bypass and riser without any problems.


Advice! In some cases old paint, applied to the nut and connection of the riser with the bypass and piping, may interfere with operation. You can remove it with a regular knife with a retractable blade or a metal brush.
Step 6 Remove the battery from the mounts.


Step 7 According to the previously defined mark on the threads connecting the heating riser to the battery, trim with a grinder.


Step 8 Remove the old battery and take it to a place where it will not interfere with further work. Given the high mass of the cast-iron radiator, do this with someone if possible.

Step 9 Remove the old battery mounts from the wall. If they hold particularly tight, use a hammer and chisel.


A heating system should be present in every home. At the same time, it is extremely important that at each stage of its installation all the rules for installing heating radiators are clearly observed - violations of any of them can lead to serious disruptions in the operation of the system and even damage the equipment.
Possible schemes for connecting radiators
Before proceeding with the process of installing heating radiators, it is extremely important to determine the connection diagram. There are several options for how to do this, this is also indicated in the snip. Each of them has both certain advantages and disadvantages. Connection methods:
- side connection. This method is perhaps the most common, since it is he who allows you to achieve maximum heat transfer from radiators. The installation principle is quite simple - the inlet pipe is connected to the upper radiator pipe, and the outlet pipe to the lower one. Thus, both the inlet and outlet pipes are located at one end of the battery.
- diagonal connection. This method is used mainly for long radiators, since it allows you to achieve maximum heating of the battery along the entire length. In this case, the inlet pipe should be connected to the upper pipe, and the outlet pipe to the lower one, which is located on the other side of the battery.
- bottom connection. Least effective method connection (compared to the side method, the efficiency is 5-15% lower), used mainly for heating systems located under the floor.

Instructions for installing heating radiators
So, how to hang radiators correctly? You have purchased radiators and even decided how they will be installed. Now you need to familiarize yourself with all the requirements of SNIP - and you can proceed with the installation. In fact, everything is quite simple.
Most radiator manufacturers, trying to make life as easy as possible for users, attach to each battery detailed instructions and rules for installing heating radiators.
And they really need to be followed - after all, if the radiator is installed incorrectly, in the event of a breakdown, warranty repairs will be denied.

If you want to protect the device from scratches, dust and other damage that may occur during installation, then during the installation process you can not remove the protective film - this is allowed by the rules for installing heating batteries. The single most important requirement, which must be strictly followed, is the strict observance of the indents necessary for the normal circulation of heated air. Here are the rules for installing heating radiators to indents put forward by SNIP:
- according to current regulations, the distance from the window sill or the bottom of the niche should be at least 10 cm. It should be borne in mind that if the gap between the radiator and the wall is less than ¾ of the battery depth, then the flow of warm air will enter the room much worse.
- equally strict requirements are put forward for the height of the installation of radiators. How to place heating batteries correctly? So, if the distance between the lower point of the radiator and the floor level is less than 10 cm, then the outflow of warm air will be difficult - and this will negatively affect the degree of heating of the room. The ideal distance is 12 cm between the floor and the radiator. And if this gap is more than 15 cm, then there will be too much temperature difference between the upper and lower parts of the room.
- if the radiator is not installed in a niche under the window, but near the wall, then the distance between the surfaces should be at least 20 cm. If it is less, air circulation will be difficult, and in addition, dust will accumulate on the rear wall of the radiator.

To get the most useful information regarding the installation of radiators, you can use our resource. You will find many valuable tips and tricks on how to correct installation heating radiator.
The procedure for installing a heating radiator
It should be noted that the SNIP also spelled out the procedure for installing the radiator. Using it, you can do everything correctly:
- First of all, you need to determine the place for the fasteners. Their number depends on the size of the battery, but even in the case of mounting the smallest radiator, there must be at least three brackets;
- Brackets are being attached. For reliability, it is necessary to use dowels or cement mortar;
- The necessary adapters, Mayevsky crane, plugs are installed;
- Now you can start installing the radiator itself;
- The next step is to connect the radiator to the inlet and outlet pipes of the system;
- Next, you need to install an air vent. According to modern SNIP, it must be automatic;
- After correct installation heating radiators is completely finished, you can remove the protective film from the radiators.
If during the installation of heating radiators you adhere to all the rules and requirements described above, then in this case you will enjoy the heat for a long time, which is provided by your correct installation of heating radiators and a well-made heating system.
Related publications
-
 Types (types) of sweeteners and sweeteners: an overview of sugar substitutes
The peak of popularity of sugar analogs in our country fell on the 90s. Who does not remember the small boxes, from which, when you click on ...
-
 Comparison of sweeteners
Having made the decision to eat right, the first thing to do is give up sugar. This does not mean that you need to deprive yourself of...