
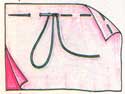
MK: Beautiful seam. Hand connecting seams

1. Do not tear off the thread for work, and even more so do not bite off with your teeth (ruin your teeth); cut it with scissors not across, but under acute angle- such an end is easier to thread into the needle. Many also do this: first they thread the thread into the eye, and then cut it off - in this case, it is more obedient in work: it does not get scared, it does not twist.
2. If you want to sew quickly, do not thread a long thread into the needle - no more than 60-70 cm. There is a very accurate Russian proverb: "a long thread is a lazy girl." And here is also a sure sign: "to sew with a long thread - to live far from your mother." So it's not worth the risk.
Z. Each seam begins with thread fastening. The simplest thing is to tie a knot at the end (Fig. 5): the end of the thread is clamped between the thumb and forefinger right hand, at the same time they pull it with their left hand and circle it around the index finger of the right hand, twist it between the fingers, lowering it down the index finger, pinch the thread with the threads between the fingers and pull them down the thread, helping with the thumb.
In other words, experienced craftswomen do not like the knot and fasten the thread like this (Fig. 6): the fabric is pierced from the front side to the wrong side and after 2-3 mm the needle is brought to the front side - the first stitch was formed on the wrong side, and the “tail” remained on the front side. Then the first stitch is sewn across the second and after that the thread is pulled tight. Pull the thread - and you will see how firmly it is fastened.
4. It must be remembered: the hands spontaneously fit the upper fabric, and the sewing machine - the lower one. For example, if you put together sections of fabric of the same length and, without sweeping, sew them on a typewriter, then as a result the bottom section will be shorter. To prevent this from happening, while sewing, you need to slightly stretch the bottom fabric. If two identical sections are sewn manually, then the upper part will “shorten”. Experienced dressmakers, knowing this feature, use it. For example, sewing an oblique cut with a shared one by hand, they sew along the oblique, and they scribble on a typewriter, placing the oblique cut from below.
5. All manual shvyg can be divided into direct and return. If the needle, laying stitches, moves only forward - these are straight seams, for example, a “forward needle” seam. When you have to not only move the needle forward, but also return it back to get the next stitch, these are return stitches (the stitch “back the needle”, “goat”, etc.).
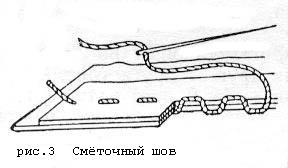
Seam "forward needle", or running,
is considered the simplest (Fig. 7) - we will start with it. They temporarily connect parts of the fabric, and if temporarily, then inexpensive, low-grade threads are used for basting. Stitches are laid from right to left. Stitch length - from 5 mm to 2 cm, depending on the purpose of the seam. The stitches on the front and back sides are the same length.
If you need to sweep more firmly, then the stitches are laid differently (Fig. 8): one stitch is long (8-9 mm), one is short (2 mm); on the wrong side, two short ones are formed.
Pin basting
- another way to connect tissues (Fig. 9). Usually they are used by dressmakers, sweeping fabrics into stripes, a cage, and patchworkers - almost constantly. This method speeds up the process of hand sewing, but it must be used wisely. The main thing here is to prick the pins correctly so that they do not fall under the machine needle: they are stuck with a point directed at a right angle to the seam. If straight sections are connected, then the pins are injected after 3-4 cm, carefully aligning the tissue sections and pulling them equally.
On rounded lines, pins are placed more often - after 5-10 mm. Connecting fabrics into a strip or a cage, the pins are injected according to the pattern, for example, into each strip, and if it is wide, then on both sides, carefully connecting it with the same strip on the bottom fabric. But in any case, you need to remember: the pins must always lie at right angles to the fabric cuts.
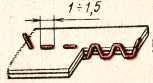
Seam "back needle"
(Fig. 10). With this strong, elastic seam, once, before the invention sewing machine sewing clothes. Outwardly, it looks like a “forward needle” seam, only the stitches are shorter and more convex. There is no similarity on the wrong side: the stitches go behind each other, forming a continuous line, and each is three times longer than the stitch on the right side. for such a strong seam and thread, you need strong, high-quality ones. They sew from right to left: the needle is brought out from the inside to the front side, a stitch is made back and under the fabric they pass two stitches forward, then they return, lay the next stitch back at some distance from the previous one and under the fabric - two stitches forward, etc.
Seam manual "stitch
» (Fig. 11). This seam is a variation of the back-to-the-needle seam, but even more durable. It is performed in exactly the same way as the previous one) only without gaps between the stitches, so the length of the stitch on the wrong side is not three, but only two times longer than that of the front stitch (clearance is excluded). A neatly executed manual “line” is difficult to distinguish from a machine one. In terms of strength, it is not only not inferior to it, but even surpasses it, especially if it is made with high-quality threads.
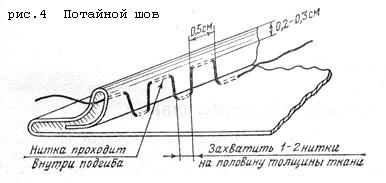
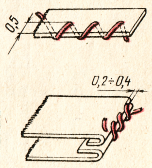
Blind stitch
(Fig. 12). The name speaks for itself: the stitches should not be visible from the wrong side, much less from the front side. Sew from right to left. They sew the bottom of the product with them, attach ribbons, braid, sew on facings, etc. In the old days, the work of a dressmaker was primarily evaluated by how the hem was hemmed: if the stitches are not visible, it means that the dressmaker is experienced and accurate. Pay special attention to this seam and learn how to perform it according to all the rules.
Take a piece of light fabric measuring 20x20 cm, a thin short needle No. 2 and black threads (so that all errors are immediately visible on the sample). Tuck one of the sides by 4 cm and sweep, stepping back from the edge of 5 mm (in no case do not iron the hem - it should be airy). Now make a small knot on the thread, insert the needle inside the hem, bring it into the fold and stick the needle exactly under the thread sticking out of the fold, capturing only one or two threads of fabric (make sure that the needle does not pierce the fabric through). Pull out the thread. Again, insert the needle into the fold, pricking it next to the previous puncture, and make a stitch inside the fold (7-8 mm), then pull the needle out of the fold, pull the thread to the end and sew the fabric exactly under its exit, grabbing one or two threads. Continue sewing, checking from time to time to see if the black thread is visible from the right side of the pattern.
A little tip: in order to better see the course of the needle along the fold, turn the hem to the front side, folding it with the front side of the front product.
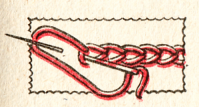
Cross seam
- "goat" (Fig. 13). Such a seam is used to connect thick, non-flowing fabrics, hem knitwear, and use it in applications. Sew from left to right, as well as from bottom to top. On a piece of fabric, fold one edge and fold over. Thread a black thread into the needle and fasten it in the hem, pulling it up from the edge by 5 mm. Insert the needle (point to the left) into the fabric under the hem, pick up one or two threads and pull out the needle. Make the same stitch on the hem, stepping back 7 mm from the point where the thread is fixed, then the lower one and so alternate.
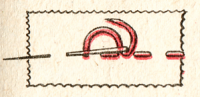
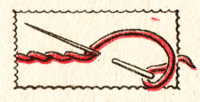
Buttonhole stitch
(Fig. 14). Buttonhole stitches overcast fabric sections, use in appliqués, perform air stitches and cut through buttonholes. It is more convenient to lay stitches from left to right, but you can also work from right to left. Fasten the thread on the left and throw it on the needle in the form of a loop. The distance between the stitches is 2-4 mm, the stitch height is from 5 to 10 mm.
The tree and the owl are made of rags sewn to the burlap with a buttonhole stitch. The leaves are embroidered with a goat.
Hand stitches
Before talking about the seams that we will have to use in working with flaps, get acquainted with general rules for all types of hand seams.
|
- It must be remembered: the hands spontaneously fit the upper fabric, and the sewing machine - the lower one. For example, if you put together sections of fabric of the same length and, without sweeping, sew them on a typewriter, then as a result the bottom section will be shorter. To prevent this from happening, while sewing, you need to slightly stretch the bottom fabric. If two identical sections are sewn manually, then the upper part will “shorten”. Experienced dressmakers, knowing this feature, use it. For example, sewing an oblique cut with a shared one by hand, they sew along the oblique, and they scribble on a typewriter, placing the oblique cut from below.
- All manual seams can be divided into straight and return. If the needle, laying stitches, moves only forward - these are straight seams, for example, a “forward needle” seam. When you have to not only move the needle forward, but also return it back to get the next stitch, these are return stitches (the stitch “back the needle”, “goat”, etc.).
Seam "forward needle", or running, is considered the simplest (Fig. 3) - we will start with it. They temporarily connect parts of the fabric, and if temporarily, then inexpensive, low-grade threads are used for basting. Stitches are laid from right to left. Stitch length - from 5 mm to 2 cm, depending on the purpose of the seam. The stitches on the front and back sides are the same length.
If you need to sweep more firmly, then the stitches are laid differently (Fig. 4): one stitch is long (8-9 mm), one is short (2 mm); on the wrong side, two short ones are formed.

Pin basting- another way to connect tissues (Fig. 5). Usually they are used by dressmakers, sweeping fabrics into stripes, a cage, and patchworkers - almost constantly. This method speeds up the process of hand sewing, but it must be used wisely. The main thing here is to prick the pins correctly so that they do not fall under the machine needle: they are stuck with a point directed at a right angle to the seam. If straight sections are connected, then the pins are injected after 3-4 cm, carefully aligning the tissue sections and pulling them equally.
On rounded lines, pins are placed more often - after 5-10 mm. Connecting fabrics into a strip or a cage, the pins are injected according to the pattern, for example, into each strip, and if it is wide, then on both sides, carefully connecting it with the same strip on the bottom fabric. But in any case, you need to remember: the pins must always lie at right angles to the fabric cuts.
 |
Seam "back needle"(Fig. 6). This strong, elastic seam was once used to sew clothes before the invention of the sewing machine. Outwardly, it looks like a “forward needle” seam, only the stitches are shorter and more convex. There is no similarity on the wrong side: the stitches overlap each other, forming a continuous line, and each is three times longer than the stitch on the right side. For such a strong seam and thread, you need strong, high-quality ones. They sew from right to left: the needle is brought out from the inside to the front side, a stitch is made back and under the fabric they pass two stitches forward, then they return, lay the next stitch back at some distance from the previous one and under the fabric - two stitches forward, etc. |
Blind stitch(Fig. 8). The name speaks for itself: the stitches should not be visible from the wrong side, much less from the front side. Sew from right to left. They sew the bottom of the product, attach ribbons, braid, sew on facings, etc. In the old days, the work of a dressmaker was primarily evaluated by how the hem was hemmed: if the stitches are not visible, it means that the dressmaker is experienced and accurate. Pay special attention to this seam and learn how to perform it according to all the rules.
Take a piece of light fabric measuring 20x20 cm, a thin short needle No. 2 and black threads (so that all errors are immediately visible on the sample). Tuck one of the sides by 4 cm and sweep, stepping back from the edge of 5 mm (in no case do not iron the hem - it should be airy). Now make a small knot on the thread, insert the needle inside the hem, bring it into the fold and stick the needle exactly under the thread sticking out of the fold, capturing only one or two threads of fabric (make sure that the needle does not pierce the fabric through). Pull out the thread. Again, insert the needle into the fold, pricking it next to the previous puncture, and make a stitch inside the fold (7-8 mm), then pull the needle out of the fold, pull the thread to the end and sew the fabric exactly under its exit, grabbing one or two threads. Continue sewing, checking from time to time to see if the black thread is visible from the right side of the pattern.
Little hint: to better see the course of the needle along the fold, turn the hem to the front side, folding it with the front side of the front product.

Cross seam - "goat"(Fig. 9). Such a seam is used to connect thick, non-flowing fabrics, hem knitwear, and use it in applications. Sew from left to right, as well as from bottom to top. On a piece of fabric, fold one edge and fold over. Thread a black thread into the needle and fasten it in the hem, stepping up from the edge by 5 mm. Insert the needle (point to the left) into the fabric under the hem, pick up one or two threads and pull out the needle. Make the same stitch on the hem, stepping back 7 mm from the point where the thread is fixed, then the lower one and so alternate.

Buttonhole stitch(Fig. 10). Buttonhole stitches are used to overcast sections of fabrics, used in appliqués, perform air and welt loops for buttons. It is more convenient to lay stitches from left to right, but you can also work from right to left. Fasten the thread on the left and throw it on the needle in the form of a loop. The distance between the stitches is 2-4 mm, the stitch height is from 5 to 10 mm.
M. Maksimova M. Kuzmina "Patchwork"
SOURCE:
Hand stitches
. Interlining seam(Fig. 1) is used to indicate the middle of the product, as well as to indicate corrections marked with pins during fitting. Stitch length - 2-3 cm. When applying stitches to the fabric, the thread is not pulled. Needle punctures are made from right to left.

. silky(Fig. 2) are used to transfer lines to parts of the same name. To do this, running stitches are laid along the line without pulling the thread. Stitches form loops 1.5-2cm. After applying the snares, the parts are moved apart, the threads of the stitches between them are pulled and cut.

. Basting seam(Fig. 3) is used for temporary fastening of parts to each other. The length of the running stitch depends on its purpose and the thickness of the fabric.
. Blind stitch(Fig. 4) is used for hemming the bottom of the dress, neck, sleeves. To make this seam, a bent and slightly turned edge of the fabric is pierced with a needle inside the fabric, the needle is advanced 0.5-1 cm, the lower fabric is pierced near the exit of the needle, grabbing 1-2 threads, etc.
. Seam "over the edge"(Fig. 5) is used in cases where it is required to connect two edges of the fabric.

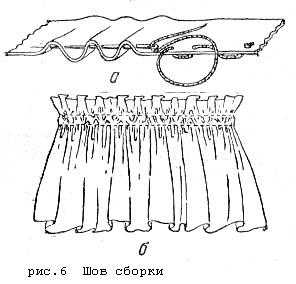
. Assembly seam(Fig. 6) is used for gathering fabric into an assembly (Fig. 6a), and also as a finishing one (Fig. 6b).
. Hand seam stitching(Fig. 7) by appearance looks like a machine. When it is performed, the needle sticks into the place where it exited in the previous stitch. The stitch length of this seam on the wrong side is equal to two stitches on the right side. On the front side, the stitches should converge tightly to each other. A hand stitch is used when a tight and strong stitch is required, but it is not possible to use a machine stitch.

. Seam "behind the needle"(Fig. 8) is used when sweeping fabrics into a cage and a strip. It is performed in the same way as hand seam stitch, but some spacing is allowed between stitches.
![]()
. Shtukovka(Fig. 9) is used to firmly and imperceptibly sew up a cut in woolen and cloth products. Also for tailoring. fur products. In woolen products, the piece is performed in the following order: a needle is inserted, slightly retreating from the edge of the cut of the product, and stitches are made over the edge back and forth with a needle, as in darning, slightly pulling one edge of the cut to the other (Fig. 9a). Stitching a direct cut in coarse fabrics (drape, cloth) requires the following technique: the needle is inserted into the edge of the cut, without going through the entire thickness of the tissue (Fig. 9b), but only reaching the upper corner of the cut. Stitches are made not over the edge, but inward from the edge of the cut back and forth with a needle. Then, from the inside, a seam is laid over the edge, without piercing the entire fabric with a needle, but only capturing the wrong layer. The second seam (Fig. 9c) is performed for the strength of the closed cut. Threads are selected according to the color and thickness of the fabric.

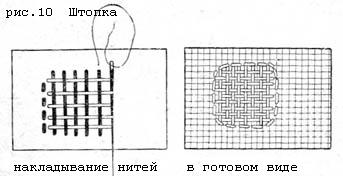
Darn(Fig. 10) is used to repair frayed places in fabrics. Darning stitches are superimposed in the longitudinal and transverse directions.
Hand stitches

|
|
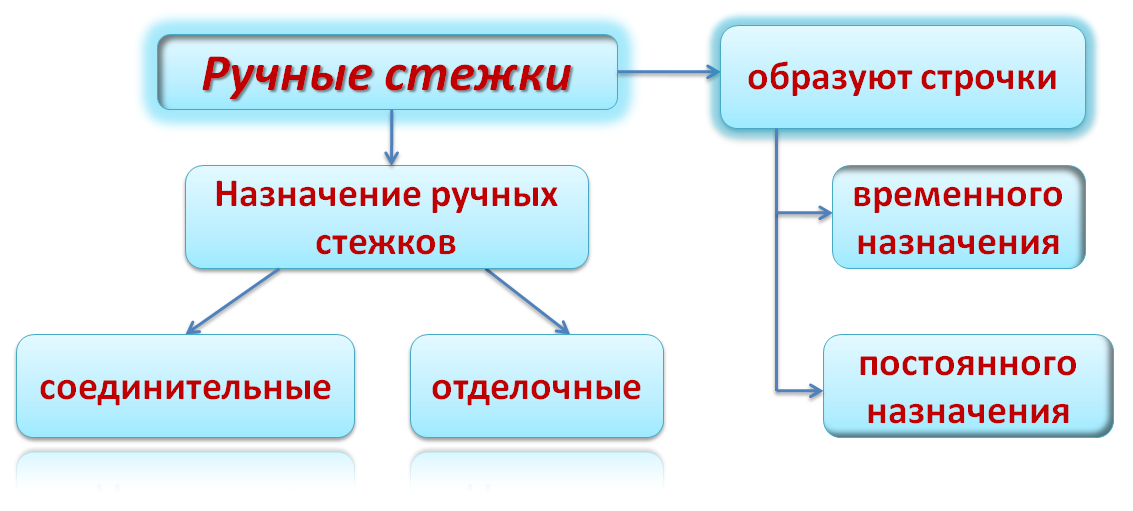
According to their purpose, hand stitches are divided into connecting And finishing . Hand stitches form stitches temporary And permanent destination.
Hand stitches and stitches
|
stitches |
lines |
graphic |
|
Temporary lines |
||
|
Direct |
Estimating Copy |
|
|
Permanent stitches |
||
|
oblique |
Overcasting (in 1 cm 3 - 4 stitches) Hemming (in 1 cm 3 - 4 stitches) |
|
|
Loop-shaped |
Stitched (in 1 cm 4 - 5 stitches) |
|
|
Looped |
overcasting |
|


Types of finishing hand stitches
![]()


Preparation for work
In order to qualitatively perform certain sewing manual works, it is necessary to know the methods of threading a thread into a needle, tying a knot at the end of a thread, and working with a thimble.
Thread length for handmade should be equal to twice the distance from the hand to the elbow of the worker (no more than 80 cm).
Proverb - Long thread, lazy seamstress.
Before threading the needle, the end of the thread is twisted between the thumb and forefinger of the right hand. The needle is held between the thumb and forefinger of the right hand, with the eye towards the thread. With the left hand, the twisted thread is inserted into the eye of the needle and pulled out 2/3 of the length.
It is necessary to tie a knot at the end of the thread so that the line does not unravel.
Sewing hand stitches


6. Basting lines are removed after sewing.
Hand seam
Hand stitch. Most of the readers, having opened our "Encyclopedia" on this chapter, will say that it is completely superfluous to talk in detail about the hand seam, especially now that so often the machine seam replaces the hand
We hasten to answer them that of all women's work, it is most important to know in all details the hand seam, since it is he who represents the basis of any work with a needle.
Hands that perform well in all kinds of seam will not encounter difficulty in the execution of any kind of ornament.
However, whatever the conditions in which life puts you, it is always useful to be able to sew well. Because if, on the one hand, the ability to sew makes it easier to correctly evaluate someone else's work, then, on the other hand, you always have the opportunity to do a good and solid job with your own hands, if the need forces you to do it.
Body position. Before proceeding to the explanation of stitches and seams, we note that, whatever your work, you need to take care of a comfortable posture. Long experience allows us to affirm positively that there is no such seam or embroidery that would make us sit uncomfortable.
First of all, for a comfortable and calm posture, it is necessary that the height of the chair matches the height of the table. The hands should hold the work at such a height that it is not necessary to lower the head, which should be kept as straight as possible and, at the most, slightly tilted forward.
You should never pin work to your knee: the posture that the body takes is ugly and unhygienic. The work must be pinned to a pillow with a heavy base so that this pillow cannot be fed during stitches.
Needles. For sewing, you need to use needles of the first grade and very elastic. To find out if they are elastic enough, break one needle with your hands. If it is sufficiently elastic, then a decent resistance will be felt before the fracture and the fracture itself will come out smooth.
But if the needle breaks easily, like glass, or bends like wire, it is bad. You should never sew with curved needles, because when you use them, the stitches come out wrong. The eye of the needle should be very smooth so that the tip of the thread does not unravel and cut through.
Seams on thin linen are made with short or semi-long needles. Other works are performed with long needles. Therefore, it is useful to have at least three varieties of needles.
The needle should be slightly thicker than the thread so that the thread slides freely into the holes.
To protect the needles from rust, it is good to put a little powdered talc in the bags. It is also good for those persons whose hands sweat (which is why the needles rust), from time to time to dip the fingertips into a box with amianth.
You can also fill the pillow with fine sand and stick needles into it, slightly rusty.
Scissors. Scissors for work must have two pairs: one large with one sharp, the other with a rounded end, others - small, for cutting threads, tips and cutting out small particles of matter. The same scissors are also used in many of the works described below. The rings of scissors should be round and as wide as possible, because small rings tire the hand and leave marks on the fingers.
Thimble. A steel thimble is better than a bone thimble, which is too fragile, and a silver thimble, in which the dimples are too small. A good thimble should be light, slightly rounded at the end, and its edges should not lag behind the finger.
Thread length. The sewing thread should not be longer than 50 cm; for reference, it can be longer.
It is better to cut the thread than to cut it off, which is why it unwinds.
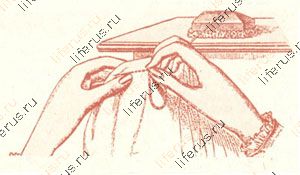
Fig.1. Strengthening the thread near the eye
(Fig. 1)
If the thread is not long, but they still don’t want to change it, then you can fasten it with a loop at the very eye of the needle.
As for the knots, no matter what kind of work it is, they should be almost invisible, although they are tied firmly.
It does not matter either which end of the thread is threaded into the needle. It is imperative to thread the end that was cut off from the coil. If you thread it with the reverse end, the thread becomes shaggy and loses its luster.
Threads.
For basting, cheap threads are used, soft and specially manufactured for this purpose.
Alsatian cotton is best for sewing. D.M.C. threads, black and white.
![]()
Fig.2. Hand position for cushion sewing
(Fig. 2).
Pin the fabric to the pillow and hold with your left hand. But left hand should never lean on a pillow or on a table.
The thumb and forefinger of the right hand should grab the needle at half the length.
Middle finger, on which the thimble is put on, rests on the eye of the needle and advances it into the matter far enough so that the thumb and forefinger can grab it below the stitch and stretch it along with the thread.
The thread passes between the 4th and 5th fingers and forms a loop on the last one, which must be pulled through gradually so that a knot does not form. fingers
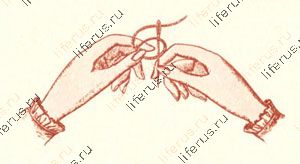
Fig.3. Hand position for sewing without pad
Hand position for a seam without a pad.(Fig. 3)
If pads are not to be used, then do not wrap the cloth around the index finger of the left hand, but only hold it between the thumb and forefinger and let it hang freely over the other fingers.
However, if the matter should be somewhat stretched, then pinch it between the 4th and 5th fingers. Then the matter is not collected and is not stretched along the seam.
Stitches.
For various kinds of seams, there are four types of stitches: forward needle, behind the needle, scar and over the edge.

Fig.4. Seam forward needle
(Fig. 4).
This is the simplest seam and is shown to children first of all.
The needle is injected into the fabric a little ahead of the previous stitch (threads after 2 - 4) and pulled back at the same (sometimes less) distance.
If matter allows, then the needle is injected several times in a row, back and forth, and then pulled out together with the thread.
This seam is used for a simple seam, assemblies and when sewing light fabrics.

Fig.5. Seam per needle
(Fig. 5).
They grab six threads of fabric with a needle from right to left, then, pulling out the thread, they stick the needle back, behind the thread.

Fig.6. Line
(Fig. 6).
This is the name of the seam for the needle, if there is no gap between the stitches. The needle is inserted into the same hole from which the previous thread comes out, and is pulled out at a distance equal to the next stitch.
This seam must be very regular, and this is achieved at first only by counting the threads of matter.
The stitch takes one or two threads, depending on the thickness of the matter. With a straight line for linen, the thread is pulled out fine fabric where the seam should be.
The pulled thread will be replaced by stitches. If the line should go sideways or along thick matter, then in order for the line to be straight, a basting is made with a thread that differs in color from the matter.
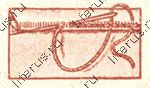
Fig.7. Scar stitching
(Fig. 7).
It is performed with the seam just described. The scar is first bent along a straight thread. Then they pull out the thread (or make a basting) for the line, retreating two or three threads from the bend. The face of the work is on the side where the stitches are.
(Fig. 8).
In order for the scar to come out well, you must first bend the matter along a straight thread. If the material is hard, like linen, nansuk or calico, then first, to make it softer, it is rubbed between the fingers. The first bend is made at most 2 mm over the entire length of the seam. Then they make a second bend (what width is needed). The edge of matter is hidden between two bends. Only scars wider than 1 cm are swept in, and the first bend is made only so wide that the matter does not spill out.
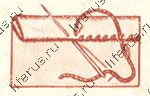
Fig.8. simple scar
For a stitch, one thread of matter is captured under the scar and the needle is passed a little obliquely, two threads above the bend of the scar. The gap between the stitches is two threads. The stitches should form a straight line. Pulling the thread for this is not recommended, as the matter loses its strength from this.
Woolen matter does not hold a fold, and therefore it has to be folded gradually over two or three stitches or basted.
This seam is also used in cases where it is necessary to make a tucked seam. The needle should pass into the lower fabric and into the middle (tucked) layer, but the stitches should not be visible from the side that lies on the left hand.
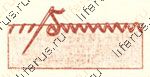
Fig.9.

Fig.10.
CONTINUED ON SITE: http://encework.liferus.ru/ruchn_shov.aspx
It turns out that sewing by hand is not always as long and inconvenient as many people think. Sometimes the sewing speed on the machine and on the hands are almost the same - when something small and complex is sewn.
According to the Celt:
We somehow saw such a shirt in a museum, even my husband still remembers the seams, without saying
about me :) So I wanted to learn for real, because if you know how to sew well, it doesn’t take so long at all. A 17-year-old girl lived with me in the hostel, so she was engaged in all sorts of
reenactment games and once sewed myself a charming long velvet dress in the style of the 18th century with all sorts of inserts and lace - in a day! I also sewed clothes on my hands - shirts, a jacket ... It's not that long, actually. Some things are even more convenient than in a car, it’s just to stitch quickly, and everything else is also - until you slip it in, while you chop or sweep it, until you turn ... These actions are done faster on your hands, so the total time is not too different, at least for me, because I am unprofessional with the machine.
I have about the same - professional seamstresses who know how to use special feet, etc., probably sew quickly and accurately on machines. But I usually sew with one main foot - there are others, but I don’t know how to use them, I’m going to sit down and learn. Sometimes I sew on my hands, and I was surprised to find that it happens quickly and conveniently.
Principles of hand sewing
For sewing, you need to use needles of the first grade and very elastic. To find out if they are elastic enough, break one needle with your hands. If it is sufficiently elastic, then a decent resistance will be felt before the fracture and the fracture itself will come out smooth. But if the needle breaks easily, like glass, or bends like wire, it is bad. You should never sew with curved needles, because when you use them, the stitches come out wrong. The eye of the needle should be very smooth so that the tip of the thread does not unravel and cut through.
For various types of seams four kinds of stitches: forward the needle, behind the needle, scar and over the edge.
It is possible to single out the most common embroidery techniques at the moment: cross, half-cross, satin stitch, petite, beadwork, ribbon embroidery, silhouette embroidery, assisi, blackwork.
When sewing on the hands, the top layer of fabric is planted. Everyone knows that the machine plants the bottom layer, although there are all sorts of paws about which manufacturers say that they do not plant. And when sewing on the hands, the opposite happens (if you do NOT sew using the embroidery method). This is how we hold the fabric in our fingers, it is not stretched straight, but slightly in an arc. Moreover, the machine just plants the bottom layer, those. pick it up a bit. And on the hands, the upper layer does not gather, but, as it were, is slightly overtightened and correctly bends around the lower layer. Layers of fabric, in particular allowances, can thus be laid on top of each other very correctly and beautifully on all roundness of the figure. Virtually no wrinkles and no steps. Fastening them with a beaded seam.
Simple hand stitches
Seam forward needle. This is the lightest and most well-known seam. A needle and thread are passed into the fabric through 2-4 threads, all the way forward from the last stitch. If the matter allows, then you can raise a few stitches on the needle, and then immediately pull the thread; thus the work is accelerated.
Seam for a needle. The needle is passed from the inside to the face, 6-8 threads of fabric are counted and the needle is brought out to the inside. Then twice as many threads are counted (12-16), the needle is pulled out again on the face and the stitch is made back, counting again 6 or 8 threads. The stitches are then repeated in that order.
Lowercase seam. A stitch seam consists of consecutive equal stitches per needle, following one after another without gaps.
This seam is difficult, requiring great accuracy and experience. In order for the seam to come out even and with uniform stitches, it is necessary to count the threads of the fabric; they are counted 3-4 per stitch, depending on the thickness of the fabric. When sewing thin linen, if necessary; so that the seam runs in a straight line, one thread of the fabric is pulled out at the place of the seam and, counting the threads, make a line. If the seam does not go in a straight line, then you must first mark the place of the line.
Scar line. The suture just described can also be used to hem a scar. The fabric is folded over with an ordinary scar and smoothed with a thimble, then one thread is pulled out of the fabric on the upper part of the scar (at a distance of 2-3 threads from the edge) and the resulting three layers of fabric are stitched along this thread with a seam.
Simple hem. To get a beautiful hem, first you need to lay a hem no more than 2 mm wide along the entire length of the hem, then also wrap the fabric a second time and start hem. In this case, it is necessary to ensure that all the stitches are even and capture no more than two threads of the fabric of the laid scar. Wide scars are pre-washed on both paper and woolen fabrics. If the stitches should not be visible, then the needle is carefully threaded through the wrong side of the fabric and the first: the bend.
Hem with embellishments. Such a seam is most often used for linen, when the edge should not only be hemmed, but also trimmed with light embroidery. First, a hem is made, starting from right to left, as indicated above, then from point a, where the hem ends, the working thread is thrown to the front side through point b (the needle does not stick into the edge of the scar) and inserted into point c from the front side into the hem; in this case, two oblique stitches are formed: a-b from the inside and b-c from the face. The last stitch in the picture is not visible, as the wrong side of the work is shown here. Then, from the point to the working thread, they are thrown to the front side through point d and the needle is inserted from the front side into the hem at point d, etc. to the end of the seam leading the embroidery from left to right. The second row of embroidery should go from right to left, and the needle should be inserted into the same holes as in the first row, and the working thread should be thrown to the front side through the same points. When finished, the embroidery will take the form shown in the figure (on the right side).
Another type of pattern is performed as follows. The work is kept face to face; the hemming scar should be facing up. Embroidery is done from left to right. The needle is inserted into the upper edge of the hemming seam at point a and they begin to make buttonhole stitch. The sequence of passing the needle: from point a to point b, then the stitch is tightened at the top (at point a); from point a to point b, again tightening the stitch at the top at point c; from point c to point b and tightening the stitch at the top at point d. Thus, at the bottom, the needle is stuck 3 times at point b. The next group of stitches should be started by counting 8 threads of fabric from the last stitch.
Seam stitching. When stitching two panels, first sweep their edge with edge, and then sew the seam forward with a needle or by the needle. After that, the seam is folded to the right and a narrow strip is cut off along the entire seam on its inner bend, and a narrow scar is folded on the outer bend and sewn with a hem seam.
Edge stitching. The panels with edges are sewn over the edge with small and frequent stitches, capturing 1-2 threads of the edges of the fabric. Work should be carried out as shown in the figure. In this case, the panel should be on the right; the stitches in this case are smoother. You can sew from top to bottom and from bottom to top, as you prefer. Do not tighten the thread too much: this spoils the seam. When the hemming is finished, the seam is straightened on both sides with a thimble or scissors. Before starting work, you should sweep the panels together so as not to pull out one of the edges.
Sewing panels and stripes with openwork. It is old and very beautiful way stitching edges. When stitching with openwork, it is recommended to baste the cloth on paper so that the openwork is even.
Double seam (French). Easily crumbling fabrics are sewn with a double or french stitch. To do this, both pieces of fabric are carefully folded face to face, edge to edge and sewn at a distance of several millimeters from the edge with a seam forward needle. Then the sewn is turned inside out, the work is carefully folded along the scar, smoothing it with hands, and stitched again so that not a single thread of the edges of the fabric is visible from the face.
Crossed, or Russian, seam. For cleanliness of work and so that the edges do not spill out, the scar is sometimes hemmed with a crossed seam. For this, a scar is laid, as with ordinary filing, but usually on the face. The work is held so that the edge of the folded scar is facing down. The needle is inserted into the scar and pulled out through point a. Then the working thread is carried out at an angle, the needle is injected into point b not into the scar, but directly into the cloth and brought out to the wrong side. Through the point into the needle, they are again brought out to the face, led obliquely, the needle is injected through the point d on the wrong side and again brought out to the face at point d, etc. There should be a distance of no more than 5 mm between stitches.
Sometimes the crossed seam is decorated with a colored hold.
Twisted stitches. For finishing linen, a herringbone seam (simple and double) is also used, which is performed with white or colored threads, as desired. The Christmas tree is good for decorating children's things.
Hem with rolled edges. When hemming very light fabrics, such as chiffon, tulle, etc., the edges of the fabric are twisted between the thumb and forefinger and sheathed with slightly beveled small stitches tightly, but without tightening the seam.
Hemming with teeth. Lay the edge of the fabric with a scar 2-3 cm wide on the wrong side and sew a needle from the face with small stitches forward in the direction indicated in the figure below, and then pull up the working thread and get cloves.
Lined with drawstring. Sometimes a lace is inserted into the lining. This is done in the following way. 2 mm from the edge to be hemmed, sew an oblique strip or braid with a seam forward with a needle in small stitches.
If the braid is sewn, then it is laid in half and hemmed to the fabric with a hemming seam, leaving the lace inside. If an oblique strip is sewn, then it is tucked in the same way as a hemming scar, and it is also hemmed with a hemming seam, a narrow scar. Both in the first and in the second case, the lace cannot be grabbed.
A useful large topic on hand seams is here club.season.ru/lofiversion/index.php/t11215.html.
People ask me how I make such even seams. I answer that all my seams are made by hand and therefore they are even.
Of course, it is impossible to do a manual machine seam on both sides. Rather, it is possible, but it will not turn out so beautifully.
But we don't need the inside. Usually we glue it. Therefore, I propose such a hand-made seam, which my mother taught me as a child. It is very common and probably everyone knows it, but still ....
I apologize for the quality of the photos. I was very tired myself (((
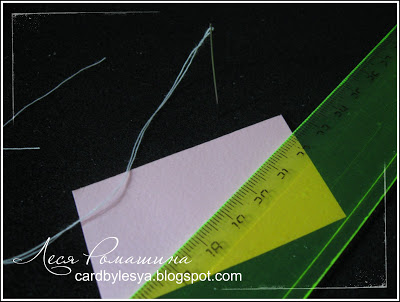
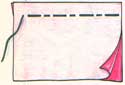
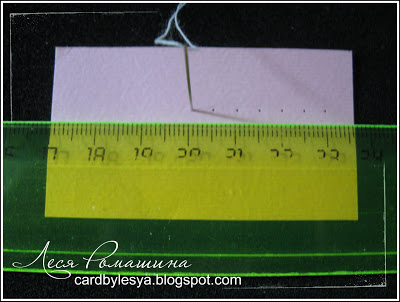
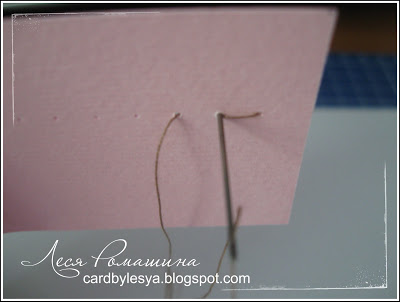
First we need to make punctures. To make our seams even, we use a ruler and a needle. There are puncture tools in stores. Unfortunately, I didn’t use it, all hands don’t reach it, so I have everything the old fashioned way)))
Every 5 mm we make a puncture.
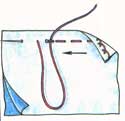
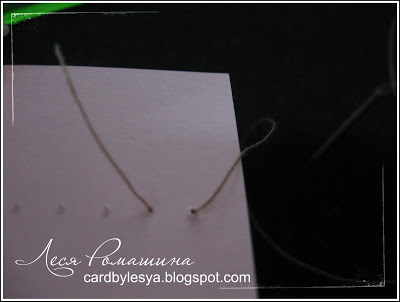
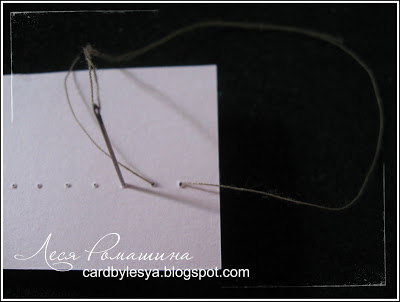
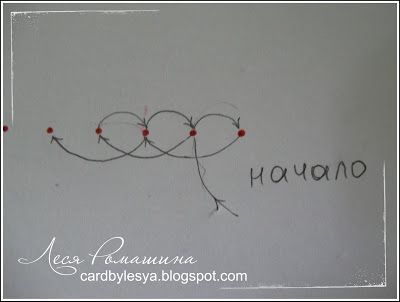
Now let's start stitching. I think the photo will be much clearer than if I decided to tell it in words))) Therefore, we look at the photo. And at the end I drew a diagram, if everything is not clear from the photo, try to understand it) The main thing is to follow the arrows.
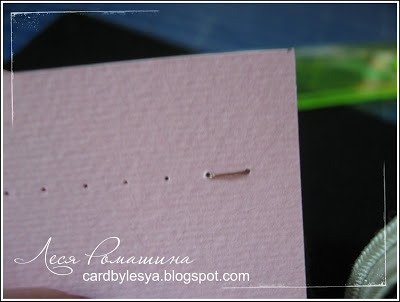
Here the threads must be tied together so that the end does not fly out. I messed up and forgot something. Usually I just fasten the end with double-sided tape to the sheet) And if you make knots, they either slip through the hole or show through the paper.
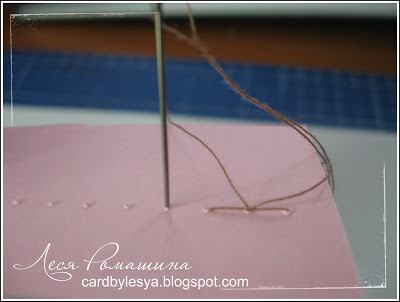

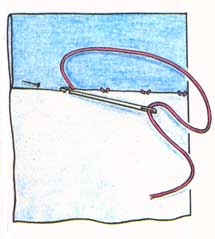
You see how beautiful and even seam on the front side of the paper...
![]()
... And this is the view from the inside.

And this is exactly the same scheme. which I drew, if nothing is clear from the photo)) Follow the arrows.
Speaking earlier about the quilt, we already mentioned that these products can be made both by hand and on a sewing machine. Based on this, you should devote some time to the types of seams that are used to create patchwork products. As you know, everything sewing seams divided into manual and machine. In turn, within each of these groups, connecting and decorative types seams. This gradation is very conditional because decorative seams also often perform the function of connecting parts, and connecting seams often perform decor. Whatever it was, let's proceed with this scheme.
Seam "Forward needle"- the most common type of seam. On the wrong side, it looks almost the same, with some minor exceptions.
Used:
a) for labels
b) for basting details
c) for stitches
In each of the listed cases, the seam looks somewhat different, but the basic requirements for its execution are constant. The following is common to the above works:
a) We begin to stick the needle into the fabric from the face of the work, as if from ourselves inwards. The thread knot should remain in front of you.
b) Your needle moves forward piercing the tissue with only its tip.
c) After several punctures, push the needle with the same hand in which you hold it, and, again, with the same hand, pull the entire needle to the front of the work. The thread will follow the needle.
d) You need to straighten the fabric so that the length of the laid thread corresponds to the length of the sewn section of the fabric.
e) We repeat the steps from point "a".
Now about the differences, they are in the length of the needle pitch and, based on this, in the pattern of the seam itself:
a) For marks, all punctures are performed approximately the same and at a distance of about 0.5 cm from each other.
b) When basting, your laid thread on the front of the work looks like a repetition of the report - * 2 short stitches (0.5 cm) and one long (1.5 cm) *. The distance between them is about 0.5 cm everywhere. This scheme is quite simple if you make 6 punctures in a row of 0.5 cm each and then, pulling the needle through the fabric and stepping back 1.5 cm from the last puncture, start all over again. This method speeds up work and facilitates further cleaning of the product from unnecessary threads.
c) When stitching the product, try to keep the stitches as short as possible. The main thing is that the tip of the needle comes out through all the layers that you connect. The distance between stitches is also much shorter than usual. It is either equal to the visible part of the seam along the face, or somewhat shorter.

Seam "For the needle"- used to replace the machine connecting seam. He looks very similar to him, but only from the front of the work. From the inside, this seam is much uglier, no matter how hard you try 😉
The scheme of its implementation is as follows:
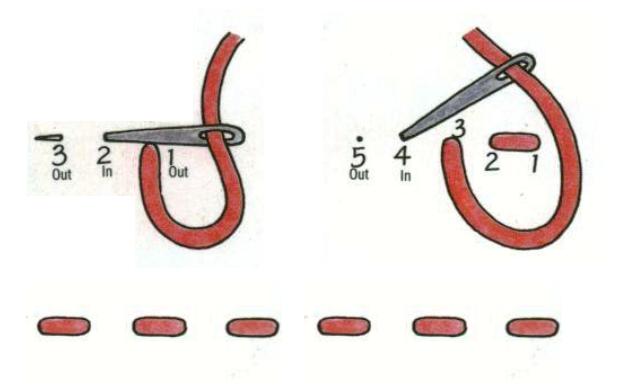
a) Having pierced the fabric “away from you” at point 1, bring the tip of the needle to point 2, then, pulling the entire needle to the surface and stretching the thread to the end, we go back a little and pierce the fabric “away from you” at point 3. Pay attention - point 3 is centered between points 1 and 2.
b) We bring the needle “toward ourselves” at point 4. Having stretched the thread, we return back to point 2, but this is already the 5th puncture for us. Again, point 2 is centered between points 3 and 4.
c) Then all actions are repeated from point "b". The main rule is that each movement of the needle forward is exactly 2 times longer than backward.
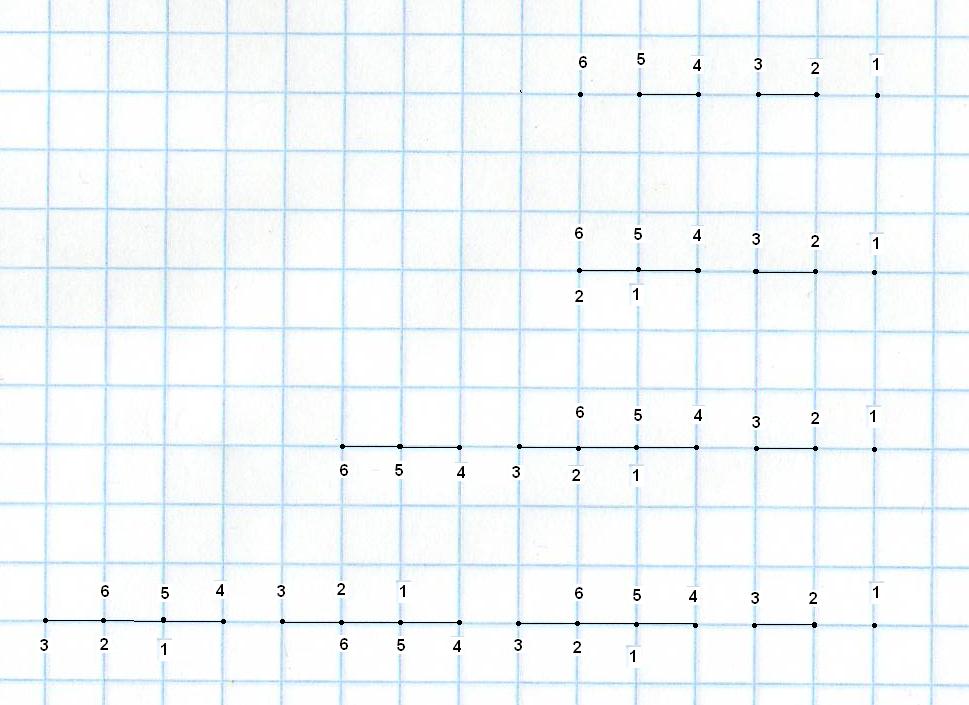 If you try to combine both previous seams, you can achieve speed without losing quality. To do this, you only need 6 small steps forward with the needle to complete 1 per needle. In other words, each next first puncture should coincide with point 5. From the front side, such a seam looks like 3 stitches in a row visible and one invisible (gap). Such a hybrid seam can also be used to connect pieces of a patchwork product. But it is important to remember that the stitch length should be such that you have at least 4 needle punctures per 1 cm.
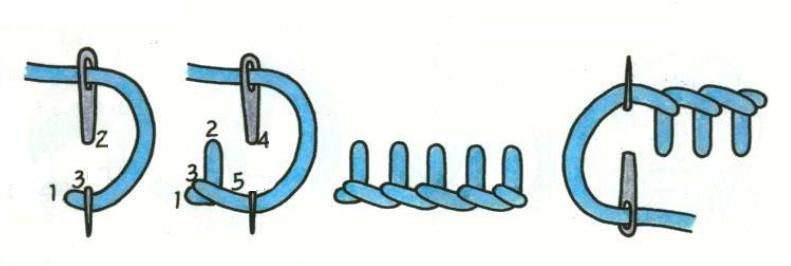 Seam "Loopy" or "Scalloped"- used in quilts only for appliques or decorative work, since the seam allowances in patchwork usually do not look out, and therefore are not processed. “Looped” and “scalloped” seams are close relatives, the difference is only in the density of the stitch. Looped is much thicker, each stitch in it is almost right next to the previous one. This seam option is used to work through welt loops or along the edge of an appliqué made of loose fabrics.
Both of these types of seam have 2 ways of execution: from right to left, or vice versa - from left to right. In this case, the position of the needle may be different than in the picture.
If, before pulling the needle through the loop of thread, wind it one turn around the needle, then such a seam is somewhat stronger and holds its shape better. But it is performed somewhat more slowly, since it requires additional movements hands. However, this often justifies itself, since if a thread breaks somewhere in your product during operation, the seam will not spread. This very coil will play the role of a knot and delay the deformation process.

Seam "Secret"- used in patchwork for sewing on the edging of the quilt by hand, as well as for making appliqués. The technique for making this seam is as follows:
a) The cut edge of the fabric is folded inward with the tip of the needle.
b) The needle enters from the bottom up through 2 layers of the upper part, but in such a way that the thread knot is between the warp part and another part superimposed on it. Bringing the needle to the surface, it is necessary to strive for the contour line of the superimposed part.
c) We stick the needle “away from ourselves” through the main part opposite the previous exit (from the upper superimposed part) and bring its tip out at some small distance (no more than 0.3 cm) moving forward.
d) Immediately opposite the exit, we pass with the tip of the needle through the upper part, grabbing only 1-2 threads from it, but so that the allowance is inside. We stretch the entire needle to the surface, and behind it the thread.
This method is good when your product is located so that the overlay part is closer to you than the main one, as if “from below it.” If your product is turned the other way around, then with a little thought you can contrive so that the invisible part of the seam will not be laid under the main part, and inside superimposed on it. Then your seam can rightly be called "secret".😉
When quilting, you will often need to grow the middle layer. We are already talking about this, but now about what types of seams should be used.
 Seam "Over the edge"- laying one part on another, lay oblique stitches over the edge. This will be done quickly enough if not the entire needle is inserted, but its tip, constantly moving in only one direction. You need to wind the fabric around the needle. You need to make several similar “turns” of fabric in a row, and only then push the needle and pull the thread. If you lay the same oblique stitches in the opposite direction on top of the previous ones, then seam "Cross-shaped". Having connected the details in this way, it is necessary to reveal them. The parts will become butt, you just have to tweak them a little.
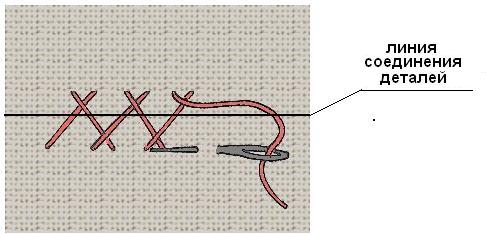 Butt-joining parts can also be done using seam "Goat". It is performed from left to right, and your needle is directed with its eye in the direction of advance. The seam is quite simple to perform if you periodically repeat 2 punctures with a needle through one fabric, and then switch to another in order to perform exactly the same punctures on it. It is only important to follow the working thread, it should be away from the needle. This seam is formed by oblique stitches, and therefore has some slack. In order for your butt-joined parts not to diverge, it is better to initially foresee some slight overlap between them. Having finished the seam, you will only stretch the parts and they will lie butt quite tightly to each other. Such a seam from the inside looks like two, separately located seams “forward the needle”.
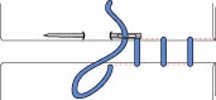
Related publications
-
 Pickled cucumbers (easy recipe, very tasty)
Every hostess makes cucumber blanks for the winter, and every notebook has proven recipes for cucumber blanks, and of course, I ...
-
 How do men perceive you?
Frozen Heart You feel the eyes of men on you, but they rarely approach you. Common situation? All because of your cold gaze and...